

There are no items in your cart
Add More
Add More
| Item Details | Price | ||
|---|---|---|---|
We know that building and deploying machine learning models isn't just about writing code. It's about making your ML workflows reproducible, scalable, and automated. This is where Machine Learning Operations, or MLOps, comes in – bridging the gap between data science and operations. However, implementing MLOps can be challenging, often requiring the integration of diverse tools and managing complex, manual interventions. You might find yourself juggling various scripts, struggling with environment consistency, or facing bottlenecks when trying to scale your experiments or deploy models to production.
Enter Kubeflow, an open-source, Kubernetes-native platform designed to simplify and streamline the entire ML lifecycle. It began as Google's initiative to open-source how they ran TensorFlow internally, based on a pipeline called TensorFlow Extended. Since then, it has evolved into a comprehensive foundation of tools for running AI workloads on Kubernetes. Think of it as the "MLOps platform for Kubernetes" , providing a unified and consistent environment for your machine learning endeavors.
Why should you care about Kubeflow? It offers compelling advantages that can transform your ML operations. First, its composability means its components are modular and can be used independently or as a full platform, giving you flexibility. This modularity is a significant advantage: you're not forced into an all-or-nothing adoption. You can start by addressing specific pain points, perhaps just using its pipeline capabilities for workflow orchestration, and then incrementally integrate other components as your needs evolve. This lowers the initial barrier to entry and allows for more tailored solutions, while still providing a clear path for future expansion.
Second, Kubeflow ensures portability, allowing you to deploy your ML workloads consistently across diverse infrastructures – from experimenting on your laptop to moving to on-premises clusters or any cloud environment. This consistency is crucial for reducing friction when moving models from development to production. Third, it provides inherent
scalability, letting you easily scale your AI models and deployments based on demand, by leveraging Kubernetes' powerful capabilities. Furthermore, Kubeflow simplifies much of Kubernetes' underlying complexity, allowing AI practitioners like you to focus on model development and iteration rather than getting bogged down in intricate infrastructure details. This abstraction is a core value proposition, democratizing sophisticated ML deployments by lowering the barrier to entry for ML practitioners who aren't Kubernetes experts, thereby accelerating the development and deployment of AI solutions.
This platform's origin as a battle-tested approach from Google, designed for large-scale, production-grade ML workloads, suggests an inherent level of robustness and adherence to best practices. Its subsequent acceptance into the Cloud Native Computing Foundation (CNCF) as an incubating project further solidifies its commitment to cloud-native principles and community-driven development, promising long-term support and evolution.
In this guide, we'll dive deep into Kubeflow's core architecture and explore its key components: Kubeflow Pipelines for workflow orchestration, Kubeflow Training Operators for scalable training, Katib for hyperparameter tuning, and KServe for seamless model serving. We'll also look at how these pieces fit together to enable a robust MLOps lifecycle, helping you build, deploy, and manage your machine learning solutions with confidence.
At its heart, Kubeflow builds upon Kubernetes, the powerful container orchestration platform. Kubernetes handles the deployment, scaling, and management of your containerized AI applications, providing the underlying infrastructure for resilience and portability.[4, 6, 8] This foundation allows Kubeflow to inherit Kubernetes' strengths in managing loosely-coupled microservices and scaling based on demand.
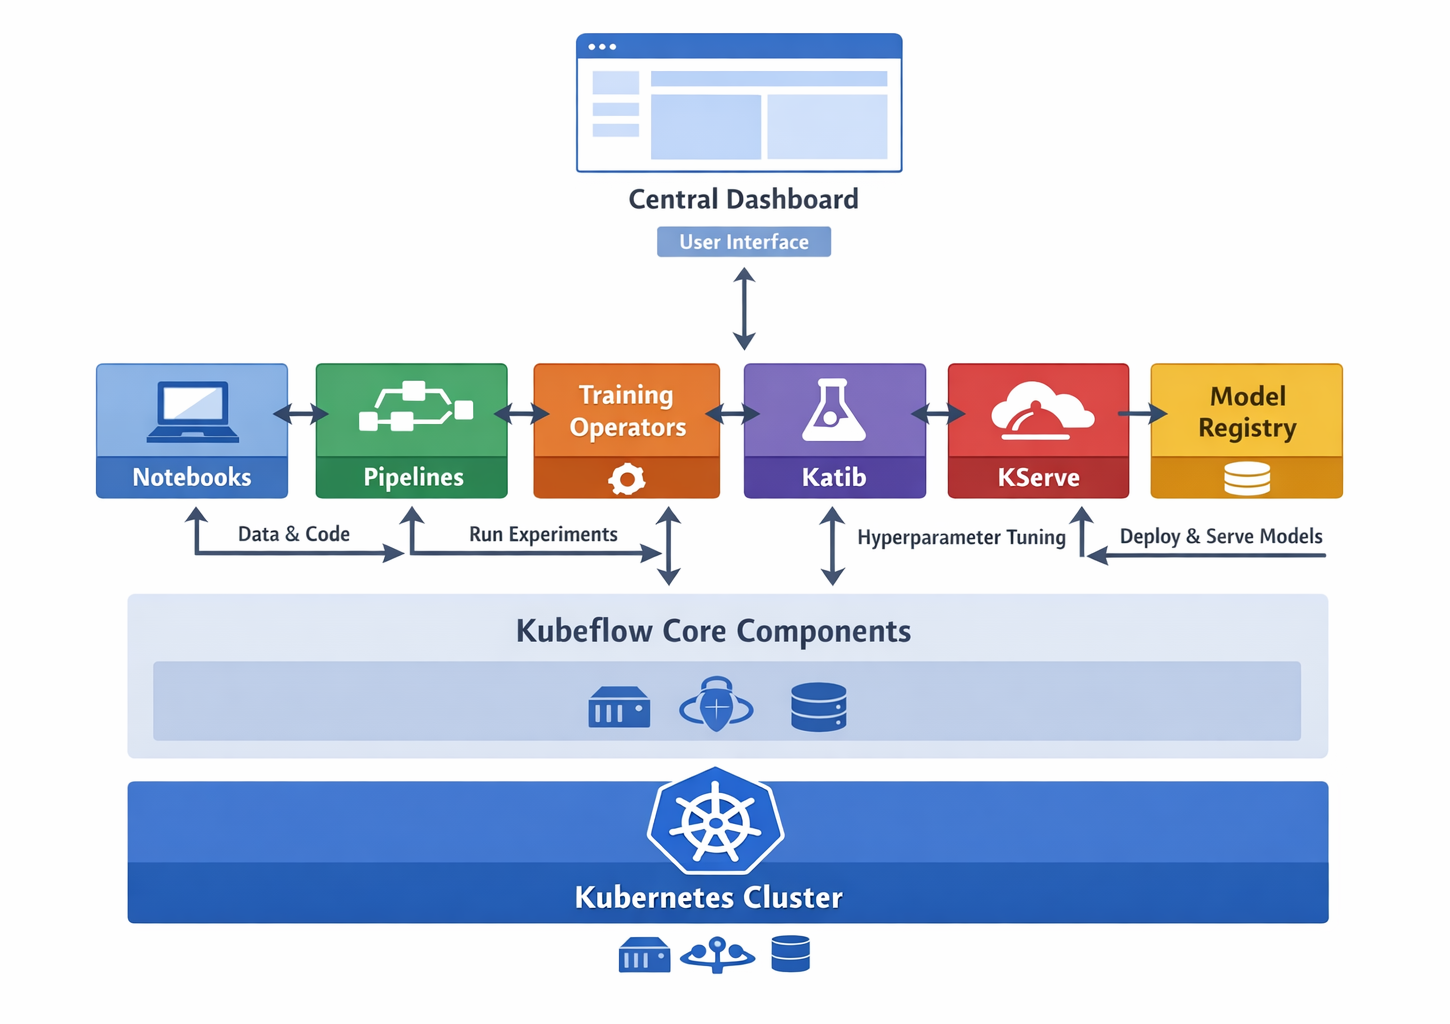
High-level Kubeflow architecture diagram showing core components and their interaction
Kubeflow brings together several specialized tools, each playing a crucial role in the MLOps lifecycle. This ecosystem approach is designed to support the entire AI lifecycle, which is an iterative process involving several stages from data preparation to continuous model improvement. The platform provides a holistic toolkit to manage this continuous feedback loop, where insights from model monitoring can feed back into earlier stages for refinement.
This comprehensive set of tools allows AI platform teams the flexibility to build upon Kubeflow by using individual projects independently or by deploying the entire AI reference platform to meet their specific needs. This pragmatic approach means you can adopt Kubeflow in stages, integrating components as your requirements grow, rather than committing to a full-scale deployment from day one.
| Component Name |
Primary Function |
MLOps Stage(s) Supported |
| Kubeflow Pipelines (KFP) |
Orchestrates end-to-end ML workflows as Directed Acyclic Graphs (DAGs) |
Model Development, Training, Evaluation, Deployment |
| Kubeflow Trainer | Scalable, distributed training of AI models (e.g., TFJob, PyTorch Job) | Model Training |
| Katib | Automated Hyperparameter Tuning and Neural Architecture Search | Model Optimization |
| KServe | Serverless inferencing for production model serving | Model Serving |
| Kubeflow Model Registry | Central index for managing models, versions, and ML artifacts metadata | Model Training, Optimization, Serving (bridges experimentation to production) |
| Notebooks | Interactive development and experimentation (Jupyter Notebooks on Kubernetes) | Model Development |
| Central Dashboard | Unified UI for accessing and monitoring Kubeflow components | All Stages (Monitoring & Interaction) |
| Kubeflow Spark Operator | Runs Apache Spark applications on Kubernetes for data processing | Data Preparation, Feature Engineering |
| Feast | Feature Store for managing offline and online features | Data Preparation, Model Serving |
At the heart of Kubeflow's workflow orchestration capabilities lies Kubeflow Pipelines (KFP). KFP is a powerful tool for implementing MLOps by automating and managing your entire ML workflow. It defines your machine learning processes as Directed Acyclic Graphs (DAGs), ensuring scalability, modularity, and reproducibility across your experiments. This emphasis on defining pipelines programmatically using a Python Domain-Specific Language (DSL) represents a fundamental shift towards "ML as Code". This approach moves away from manual, click-based workflow creation towards a version-controlled, script-driven methodology. This means significantly enhanced reproducibility, as your entire workflow is captured in a script that can be tracked in Git, aligning perfectly with DevOps principles applied to ML.
The fundamental units of any KFP workflow are its components. These are self-contained tasks, typically packaged as Docker images, that perform a specific step in your pipeline, such as data preprocessing, model training, or evaluation. They are designed to be modular and reusable, allowing you to build complex workflows from simpler, well-defined blocks. You define these components using the Kubeflow Pipelines SDK in Python.
KFP supports various component types, including Lightweight Python Components (simple Python functions), Containerized Python Components (Python functions with custom Docker images), Container Components (for tasks not solely in Python), and Importer Components (for bringing external artifacts into the pipeline). Components communicate by passing references to artifacts, which are stored in a central artifact store like MinIO.These artifacts are crucial for capturing, storing, and sharing outputs from ML workflows (datasets, models, metrics, visualizations) and maintaining a traceable lineage of data and models.This systematic tracking of data and models produced at each step is vital; if a pipeline run fails or needs to be reproduced months later, you have an immutable record of inputs and outputs at every stage, making debugging, auditing, and compliance much simpler.
Here’s a breakdown of the key artifact types KFP handles:
| Artifact Type |
Description |
Common Use Case |
Artifact |
Generic base type for any file or directory. |
Generic base type for any file or directory. |
| Represents structured or unstructured datasets. | Preprocessed data, training/test splits, feature sets, raw data after ingestion. |
Model | A trained machine learning model. | Saved TensorFlow, PyTorch, Scikit-learn models, or any other trained model format. |
| Metrics | Scalar performance metrics. | Accuracy, loss, precision, F1-score, recall, AUC, custom numerical metrics from model evaluation. |
| ClassificationMetrics | Specific metrics for classification tasks, often used for visualization in the UI. | Confusion matrix data, ROC curve data, precision-recall curve data, which generate interactive plots in the UI. |
Let's walk through a simple example to get a feel for KFP. First, you'll need the Kubeflow Pipelines SDK. If you don't have it installed, you can do so with pip:
pip install kfpNow, let's define some simple Python-based components. These functions represent distinct steps in our ML workflow:
import kfp
from kfp import dsl
from typing import NamedTuple

# Define a base image for our components. Use one that has Python and common ML libraries.
# This image will be used for the Docker containers running our components.
BASE_IMAGE = "python:3.9-slim-buster"

@dsl.component(base_image=BASE_IMAGE)
def load_data_op() -> NamedTuple("Outputs", [("data_path", str)]):
    """Loads dummy data and saves it to a file.
    In a real scenario, this would fetch data from a database, data lake, or cloud storage."""
    print("Loading data...")
    data_content = "feature1,feature2,target\n1,2,0\n3,4,1\n5,6,0"
    data_path = "/tmp/my_dataset.csv"  # KFP will manage this local path and move it to artifact storage
    with open(data_path, "w") as f:
        f.write(data_content)
    print(f"Data saved to {data_path}")
    return (data_path,)

@dsl.component(base_image=BASE_IMAGE)
def preprocess_data_op(data_path: str) -> NamedTuple("Outputs", [("processed_data_path", str)]):
    """Preprocesses the loaded data."""
    print(f"Preprocessing data from {data_path}...")
    with open(data_path, "r") as f_in:
        content = f_in.read()
    processed_content = content + "\n7,8,1"
    processed_data_path = "/tmp/processed_dataset.csv"
    with open(processed_data_path, "w") as f_out:
        f_out.write(processed_content)
    print(f"Processed data saved to {processed_data_path}")
    return (processed_data_path,)

@dsl.component(base_image=BASE_IMAGE)
def train_model_op(processed_data_path: str) -> NamedTuple("Outputs", [("model_path", str)]):
    """Trains a dummy model with the preprocessed data."""
    print(f"Training model with data from {processed_data_path}...")
    model_content = "dummy_trained_model_bytes"
    model_path = "/tmp/my_model.pkl"
    with open(model_path, "w") as f:
        f.write(model_content)
    print(f"Model saved to {model_path}")
    return (model_path,)
Next, we define the pipeline itself, chaining these components together. Notice how the output of one component becomes the input for the next, automatically defining the flow and dependencies of your workflow:
@dsl.pipeline(
    name="Simple ML Workflow",
    description="A basic Kubeflow Pipeline demonstrating data loading, preprocessing, and model training."
)
def simple_ml_workflow():
    # Call the components in sequence, passing outputs as inputs
    load_task = load_data_op()
    preprocess_task = preprocess_data_op(data_path=load_task.outputs["data_path"])
    train_task = train_model_op(processed_data_path=preprocess_task.outputs["processed_data_path"])
    # You could add more tasks here, like model evaluation or deployment
Finally, to run your pipeline, you compile it into a YAML file. This YAML file is a portable representation of your pipeline's structure and configuration. You can then upload this file to the Kubeflow Pipelines UI or submit it programmatically using the SDK client:
if __name__ == "__main__":
    # Compile the pipeline into a YAML file
    kfp.compiler.Compiler().compile(simple_ml_workflow, "simple_ml_workflow.yaml")
    print("Pipeline compiled to simple_ml_workflow.yaml. You can now upload this to your Kubeflow Pipelines UI!")

    # To run programmatically (requires KFP client configured to your cluster endpoint):
    # from kfp.client import Client
    # client = Client(host='<YOUR_KFP_ENDPOINT>') # Replace with your Kubeflow Pipelines API endpoint
    # run = client.create_run_from_pipeline_package(
    #     'simple_ml_workflow.yaml',
    #     arguments={}, # No specific pipeline parameters for this example
    #     experiment_name="My First KFP Experiment"
    # )
# print(f"Pipeline run created: {run.id}. Monitor its progress at the Kubeflow UI.")Once your pipeline is running, you can monitor its progress directly from the Kubeflow Pipelines UI. This dashboard provides a visual representation of your pipeline's Directed Acyclic Graph (DAG), showing the status of each step, logs, and output artifacts. You'll see different colors indicating success, failure, or in-progress status for each node in the graph.
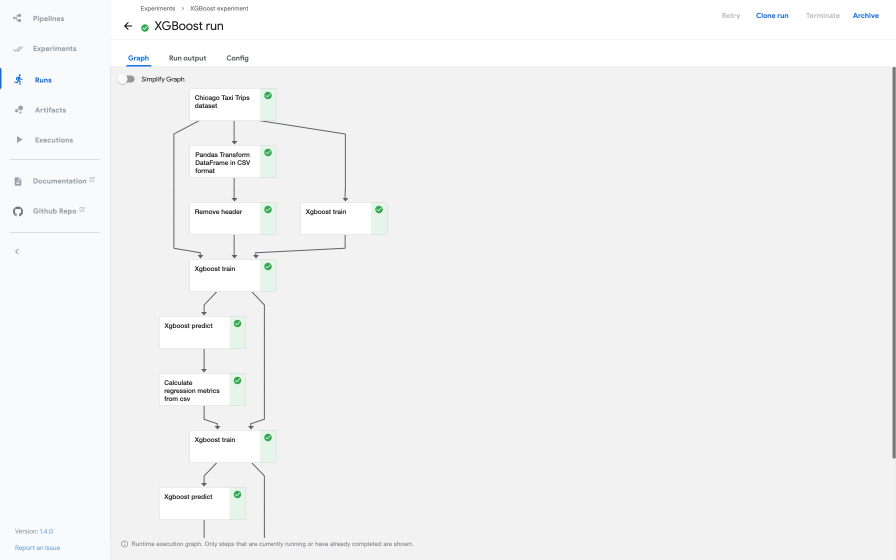
Screenshot of Kubeflow Pipelines UI showing a pipeline graph.
A particularly valuable feature is KFP's smart caching mechanism. This system reuses results from previous runs if the inputs to a component haven't changed, saving you significant time and compute resources. This is incredibly powerful for data scientists, as ML development often involves rapid iteration and rerunning parts of a pipeline. Caching dramatically accelerates the development cycle and fosters faster innovation by avoiding redundant computations.
KFP brings immense value by automating your ML workflows, ensuring reproducibility of your experiments, and providing robust artifact tracking and lineage. This means you can easily recreate results, understand the history of your models, and collaborate more effectively with your team. By capturing the entire workflow as code, KFP fosters consistency, automation, and auditability, which are crucial for complex research or regulated industries.
As your models grow in complexity and your datasets in size, training them on a single machine becomes impractical or impossible. Distributed training, where you leverage multiple machines or GPUs, is essential but can be incredibly complex to set up and manage effectively.You might face challenges with data distribution, synchronization, and fault tolerance.
Kubeflow addresses this challenge with its Training Operators, now unified under the Kubeflow Trainer project. This Kubernetes-native project simplifies scalable, distributed training of AI models, purpose-built even for fine-tuning large language models (LLMs). It consolidates efforts from previous framework-specific operators like TFJob (TensorFlow Job), PyTorchJob, and MPIJob, offering a unified and simplified experience for both users and developers.
Kubeflow Trainer offers several compelling features to streamline your distributed training workloads:
torch, DeepSpeed, HuggingFace, and Horovod. This empowers you to implement advanced distributed training strategies such as Distributed Data Parallel (DDP) and Fully Sharded Data Parallel (FSDP), enabling efficient large-scale model training on Kubernetes.Let's look at how you might define a distributed PyTorch training job using a PyTorchJob custom resource. First, you'd have your PyTorch training script, typically designed to be distributed-aware (using torch.distributed):
# train_script.py (This file would be part of your Docker image)
import osa
import torch
import torch.distributed as dist
from torch.utils.data import DataLoader, TensorDataset
from torch.nn.parallel import DistributedDataParallel

def train_pytorch():
    # The Kubeflow PyTorchJob operator sets these environment variables
    rank = int(os.environ.get("RANK", "0"))
    world_size = int(os.environ.get("WORLD_SIZE", "1"))
    master_addr = os.environ.get("MASTER_ADDR", "localhost")
    master_port = os.environ.get("MASTER_PORT", "29500")

    print(f"Rank {rank}/{world_size} starting. Master: {master_addr}:{master_port}")

    # Initialize the distributed process group
    dist.init_process_group(backend="gloo", rank=rank, world_size=world_size,
                            init_method=f"tcp://{master_addr}:{master_port}")

    # Dummy data for demonstration
    X = torch.randn(100, 10)
    y = torch.randint(0, 2, (100,))
    dataset = TensorDataset(X, y)
    sampler = torch.utils.data.distributed.DistributedSampler(dataset, num_replicas=world_size, rank=rank)
    dataloader = DataLoader(dataset, batch_size=16, sampler=sampler)

    # Define a simple model
    model = torch.nn.Linear(10, 2)
    # Wrap the model with DistributedDataParallel
    ddp_model = DistributedDataParallel(model)

    optimizer = torch.optim.SGD(ddp_model.parameters(), lr=0.01)
    loss_fn = torch.nn.CrossEntropyLoss()

    for epoch in range(5):
        sampler.set_epoch(epoch) # Important for shuffling across epochs
        for batch_idx, (data, target) in enumerate(dataloader):
            optimizer.zero_grad()
            output = ddp_model(data)
            loss = loss_fn(output, target)
            loss.backward()
            optimizer.step()
            if rank == 0 and batch_idx % 10 == 0:
                print(f"Rank {rank}, Epoch {epoch}, Batch {batch_idx}, Loss: {loss.item():.4f}")

    print(f"Rank {rank} training finished.")
    dist.destroy_process_group()

if __name__ == "__main__":
    train_pytorch()
Next, you'd define your PyTorchJob YAML manifest. This manifest tells Kubernetes how to run your distributed training job, specifying the number of replicas (workers), the Docker image containing your train_script.py, and resource requests:
apiVersion: kubeflow.org/v1
kind: PyTorchJob
metadata:
  name: pytorch-distributed-example
  namespace: kubeflow # Or your user namespace, e.g., kubeflow-user-example-com
spec:
  pytorchReplicaSpecs:
    Master:
      replicas: 1
      restartPolicy: OnFailure
      template:
        metadata:
          annotations:
            sidecar.istio.io/inject: "false" # Disable Istio sidecar for training pods if Istio is enabled
        spec:
          containers:
            - name: pytorch
              image: your-docker-registry/pytorch-train-image:latest # Replace with your image
              command: ["python", "train_script.py"]
              resources:
                limits:
                  cpu: "2"
                  memory: "4Gi"
                  nvidia.com/gpu: "1" # Request a GPU if needed
                requests:
                  cpu: "1"
                  memory: "2Gi"
    Worker:
      replicas: 2 # Number of worker replicas
      restartPolicy: OnFailure
      template:
        metadata:
          annotations:
            sidecar.istio.io/inject: "false" # Disable Istio sidecar for training pods if Istio is enabled
        spec:
          containers:
            - name: pytorch
              image: your-docker-registry/pytorch-train-image:latest # Replace with your image
              command: ["python", "train_script.py"]
              resources:
                limits:
                  cpu: "2"
                  memory: "4Gi"
                  nvidia.com/gpu: "1" # Request a GPU if needed
                requests:
                  cpu: "1"
                  memory: "2Gi"
You would then apply this YAML file to your Kubernetes cluster using kubectl apply -f pytorch-job.yaml. Kubeflow Trainer will then manage the creation and lifecycle of the pods for your distributed training job, handling the complexities of networking and fault tolerance for you. This allows you to focus on developing your PyTorch application code, abstracting away the underlying infrastructure details.
Once you have your training pipelines set up, the next logical step in the MLOps lifecycle is to optimize your model's performance. This often involves hyperparameter tuning, the process of finding the optimal set of hyperparameters (values that are not learned by the model but configured before training, like learning rate or batch size) to maximize your model's predictive accuracy. Manually searching for these optimal values can be tedious and computationally expensive.
This is where Katib comes in. Kubeflow Katib is a Kubernetes-native project dedicated to Automated Machine Learning (AutoML). It supports various optimization techniques, including Hyperparameter Tuning, Early Stopping (to stop unpromising trials early), and Neural Architecture Search (NAS). Katib is framework-agnostic, meaning it can tune hyperparameters for applications written in any language and natively supports popular ML frameworks like TensorFlow, PyTorch, XGBoost, and others.
Katib operates by defining Experiments, which are single tuning runs. Within an Experiment, you specify:
accuracy, loss), and whether you want to maximize or minimize it.int, double), and type for each hyperparameter.F(a, b) = 4a - b^2:
import kubeflow.katib as katib
import time

#  Create an objective function that Katib will evaluate
def objective(parameters):
    # Simulate some computation time for the objective function
    time.sleep(5)

    # Calculate the objective function value
    # Katib expects metrics in the format: <metric-name>=<metric-value>
    result = 4 * int(parameters["a"]) - float(parameters["b"]) ** 2
    print(f"result={result}")

#  Define the hyperparameter search space
parameters = {
    "a": katib.search.int(min=10, max=20),     # 'a' is an integer between 10 and 20
    "b": katib.search.double(min=0.1, max=0.2) # 'b' is a double between 0.1 and 0.2
}

#  Create a Katib Experiment
# Initialize the KatibClient, specifying the namespace where Katib is deployed.
# If you're using Kubeflow Platform, your user namespace might be "kubeflow-user-example-com".
katib_client = katib.KatibClient(namespace="kubeflow")
name = "tune-simple-function-experiment"

print(f"Creating Katib Experiment '{name}'...")
katib_client.tune(
    name=name,
    objective=objective,
    parameters=parameters,
    objective_metric_name="result", # The metric name printed by the objective function
    max_trial_count=12,             # Run a maximum of 12 trials
    resources_per_trial={"cpu": "2"}, # Allocate 2 CPUs for each trial's worker pod
)

#  Wait until the Katib Experiment is complete
print(f"Waiting for Experiment '{name}' to complete...")
katib_client.wait_for_experiment_condition(name=name)
print(f"Experiment '{name}' completed.")

#  Get the best hyperparameters found by the experiment
print("\nOptimal Hyperparameters:")
print(katib_client.get_optimal_hyperparameters(name))
When you run this script, Katib will launch multiple trials, each with different combinations of a and b values within the defined search space. It will then report the optimal hyperparameters that yielded the best "result" based on your objective. You can also visualize the progress and results of your experiments in the Katib UI.
Katib streamlines the optimization phase of your ML lifecycle, allowing you to efficiently find the best-performing models without extensive manual effort, significantly accelerating your path to production-ready AI solutions.
Once you've trained and optimized your machine learning model, the next critical step is to deploy it for inference, making its predictions available to applications. This process, known as model serving, requires robust infrastructure that can handle varying loads, ensure low latency, and scale efficiently.
KServe (formerly KFServing) is an open-source project specifically designed to enable serverless inferencing on Kubernetes. It provides performant, high-abstraction interfaces for common machine learning frameworks like TensorFlow, XGBoost, scikit-learn, PyTorch, and ONNX, solving complex production model serving use cases.
KServe encapsulates the complexities of production model serving, allowing you to focus on your model, not the infrastructure:
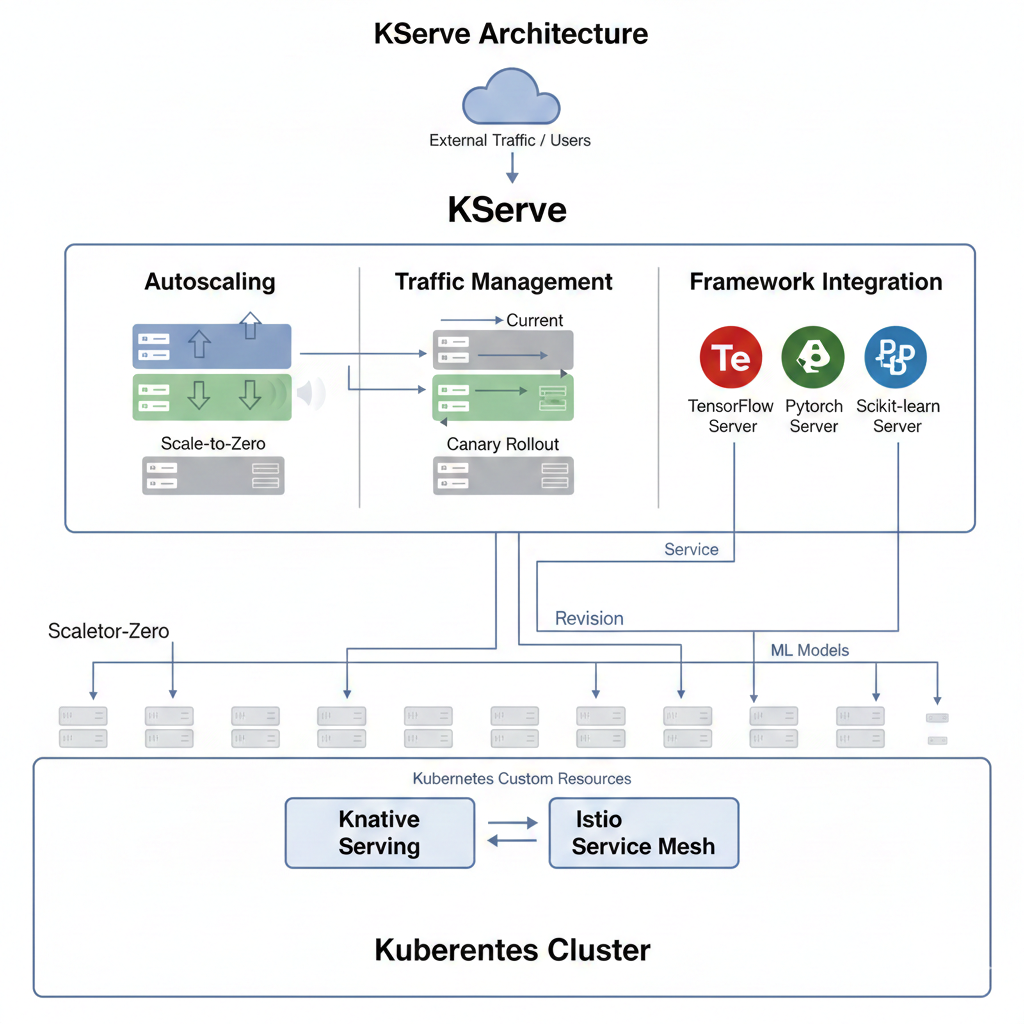
Diagram showing KServe architecture with autoscaling, traffic management, and framework integration.
Deploying a model with KServe is straightforward using its InferenceService custom resource. Let's imagine you have a trained scikit-learn model (e.g., an Iris classifier) stored in a cloud storage bucket (like Google Cloud Storage). Here's how you could deploy it:
apiVersion: "serving.kserve.io/v1beta1"
kind: "InferenceService"
metadata:
  name: "sklearn-iris" # A unique name for your inference service
spec:
  predictor:
    model:
      modelFormat:
        name: sklearn # Specifies that this is a scikit-learn model
      storageUri: "gs://kfserving-examples/models/sklearn/1.0/model" # URI to your trained model artifact
Let's break down this YAML configuration:
apiVersion: "serving.kserve.io/v1beta1": This specifies the API version for the KServe resource.kind: "InferenceService": This declares that you're creating an InferenceService, KServe's custom resource for managing model deployments.metadata.name: "sklearn-iris": This assigns a unique name to your deployed service.spec.predictor.model.modelFormat.name: sklearn: This crucial line tells KServe that your model is in the sklearn format. KServe has built-in support for various model formats and will automatically use the appropriate scikit-learn inference server.spec.predictor.model.storageUri: "gs://kfserving-examples/models/sklearn/1.0/model": This is the path to your trained model artifacts. KServe will fetch the model from this URI (in this case, a Google Cloud Storage bucket) to deploy it.You would apply this YAML file using kubectl apply -f your-model-service.yaml. KServe will then take care of spinning up the necessary infrastructure, loading your model, and exposing it via a network endpoint. You can then query your model for predictions using standard HTTP requests.
KServe simplifies the often-complex task of moving models from training to production, ensuring your AI applications are performant, scalable, and reliable.
We've explored Kubeflow's individual components, but its true power lies in how they integrate to support the entire MLOps lifecycle. This lifecycle is an iterative process, continuously refining models from data preparation to deployment and ongoing monitoring.[8, 27, 28] Kubeflow provides a comprehensive toolkit that supports each stage, enabling a seamless transition between development and production phases.
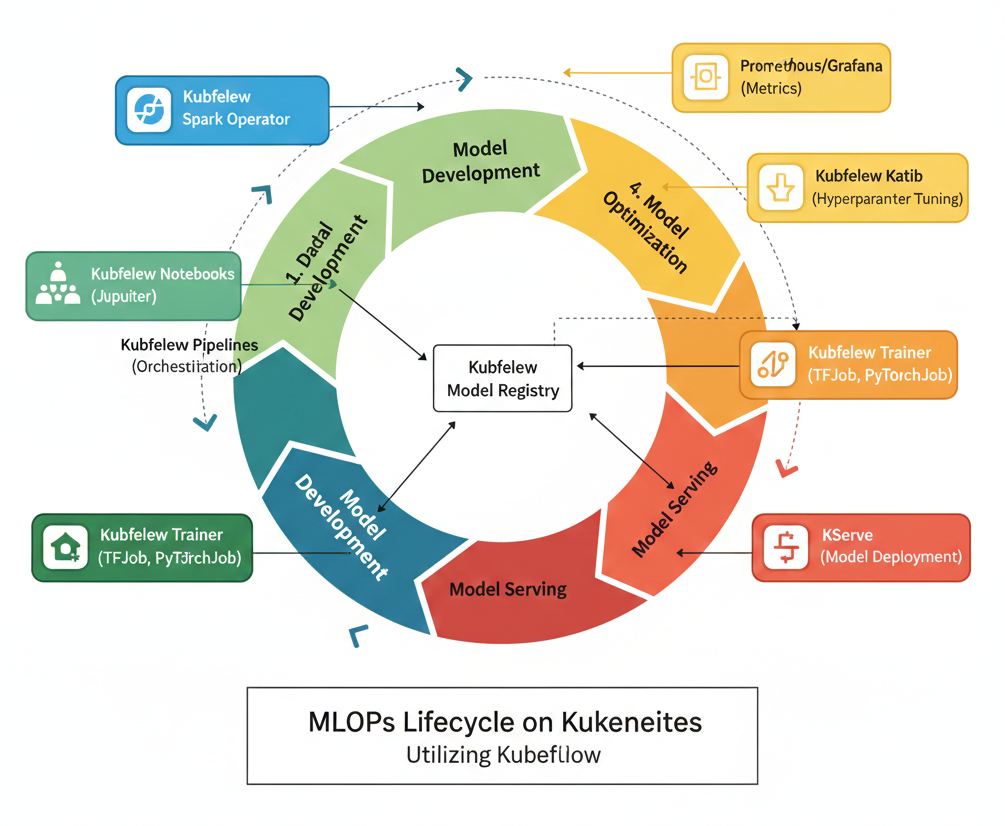
Detailed MLOps lifecycle diagram with Kubeflow components mapped to each stage.
Kubeflow Components: The Kubeflow Spark Operator can be used to run distributed data processing jobs on Kubernetes. Tools like, Feast can act as a feature store, ensuring consistency of features between training and inference.
Kubeflow Components: Katib automates hyperparameter tuning and Neural Architecture Search, efficiently exploring the vast parameter space to find optimal configurations. ML metadata generated during this phase can also be stored in the Model Registry.
Kubeflow Components: KServe provides the framework for serverless model serving, handling autoscaling, traffic management (like canary rollouts), and integrating with various ML frameworks. The Model Registry acts as a crucial bridge here, providing a central, versioned source for models approved for production.
Kubeflow Components: While specific monitoring tools (like Prometheus and Grafana) are often integrated, Kubeflow's centralized dashboard and artifact tracking capabilities provide visibility into model performance and lineage.
The entire workflow, from data ingestion to model serving, can be orchestrated and managed using Kubeflow Pipelines. KFP acts as the glue, defining and automating the sequence of operations, ensuring reproducibility, and providing a visual representation of your ML workflow. This iterative process, supported by Kubeflow's integrated components, ensures that machine learning models are developed, tested, deployed, and continuously improved in an effective and scalable manner.
To truly unleash the power of Kubeflow and ensure your MLOps practices are robust and efficient, consider these best practices:
To truly unleash the power of Kubeflow and ensure your MLOps practices are robust and efficient, consider these best practices:
Kubeflow stands as a robust, open-source platform that fundamentally simplifies and streamlines the entire machine learning lifecycle on Kubernetes. By providing a comprehensive, integrated toolkit, it addresses the inherent complexities of MLOps, from orchestrating data preparation and model training to optimizing hyperparameters and serving models at scale. Its modular design allows for flexible adoption, enabling organizations to integrate specific components as needed, while its foundation on Kubernetes ensures unparalleled scalability, portability, and reproducibility for your AI workloads.
Embracing Kubeflow empowers data scientists and ML engineers to shift their focus from infrastructure management to innovation, accelerating the development, deployment, and continuous improvement of machine learning models. It fosters better collaboration, provides crucial traceability and governance through artifact and model registries, and ultimately helps you deliver production-ready AI solutions faster and more reliably.
Ready to take your machine learning operations to the next level? Explore the official Kubeflow documentation and community resources to get started with your first pipeline, experiment with hyperparameter tuning, or deploy your next model with KServe. Dive in and transform your ML workflows today!
 Launch your Graphy