There are no items in your cart
Add More
Add More
| Item Details | Price | ||
|---|---|---|---|

{{DATE}}
Developing machine learning models is an exciting journey, but it often comes with its fair share of complexities. If you've ever found yourself struggling to remember which parameters you used for a successful experiment, or how to reliably reproduce a model that "just worked" on your machine, you're not alone. The machine learning lifecycle, from initial experimentation to deployment and monitoring, can be incredibly challenging to manage effectively.
In this detailed guide, we'll dive deep into MLFlow's core components, explore how they work together, and show you how to leverage them to build more robust and reproducible AI systems. We'll cover MLFlow Tracking, Projects, Models, and the Model Registry, providing clear explanations and practical code examples to get you started.
Imagine trying to keep tabs on dozens, or even hundreds, of machine learning experiments. It's tough to tell which combination of data, code, and parameters led to a particular result. MLFlow Tracking solves this by providing an API and UI for logging and querying data about your machine learning experiments. It's your central hub for recording everything that happens during a model training run.
Let's see how easy it is to integrate MLFlow Tracking into your Python code.
First, you'll need to install MLFlow:
pip install mlflow scikit-learn pandas
Now, here's a simple example using scikit-learn with MLFlow's auto logging feature:
import mlflow
import mlflow.sklearn
from sklearn.ensemble import RandomForestClassifier
from sklearn.model_selection import train_test_split
from sklearn.metrics import accuracy_score, precision_score, recall_score
from sklearn.datasets import load_iris
import pandas as pd
import warnings

# Suppress warnings for cleaner output in this example
warnings.filterwarnings("ignore")

# 1. Enable autologging for scikit-learn.
mlflow.sklearn.autolog()

# Prepare some dummy data
iris = load_iris()
X = pd.DataFrame(iris.data, columns=iris.feature_names)
y = iris.target
X_train, X_test, y_train, y_test = train_test_split(X, y, test_size=0.2, random_state=42)

# 2. Set experiment name
mlflow.set_experiment("Iris Classification Experiment")

# 3. Start MLFlow run
with mlflow.start_run(run_name="RandomForest_Trial_1"):
    n_estimators = 100
    max_depth = 10
    random_state = 42

    mlflow.log_param("custom_feature_engineering", "none")

    model = RandomForestClassifier(n_estimators=n_estimators, max_depth=max_depth, random_state=random_state)
    model.fit(X_train, y_train)

    y_pred = model.predict(X_test)
    accuracy = accuracy_score(y_test, y_pred)
    precision = precision_score(y_test, y_pred, average='weighted')
    recall = recall_score(y_test, y_pred, average='weighted')

    mlflow.log_metric("test_accuracy", accuracy)
    mlflow.log_metrics({"test_precision": precision, "test_recall": recall})

    # Optional plot logging
    # import matplotlib.pyplot as plt
    # plt.figure(figsize=(8, 6))
    # plt.scatter(X_test.iloc[:, 0], X_test.iloc[:, 1], c=y_pred, cmap='viridis')
    # plt.title("Predictions on Test Set")
    # plt.xlabel("Sepal Length")
    # plt.ylabel("Sepal Width")
    # plt.savefig("predictions_plot.png")
    # mlflow.log_artifact("predictions_plot.png")

    print(f"Run completed! Test Accuracy: {accuracy:.4f}")
    print("MLFlow run finished. Now, let's explore the UI!")
To run this code: Save it as a Python file (e.g., train_iris.py) and execute it from your terminal: python train_iris.py.
After running your script, you'll notice a new directory named mlruns created in the same location. This directory serves as your local backend and artifact store, storing all the logged metadata and artifacts.
To launch the MLFlow UI and visually explore your experiment results, simply open your terminal in the directory where mlruns is located and run:
mlflow ui
Then, open your web browser and navigate to http://localhost:5000 (or http://127.0.0.1:8080 if you specified a different port).
The MLFlow UI provides a powerful and interactive interface to:
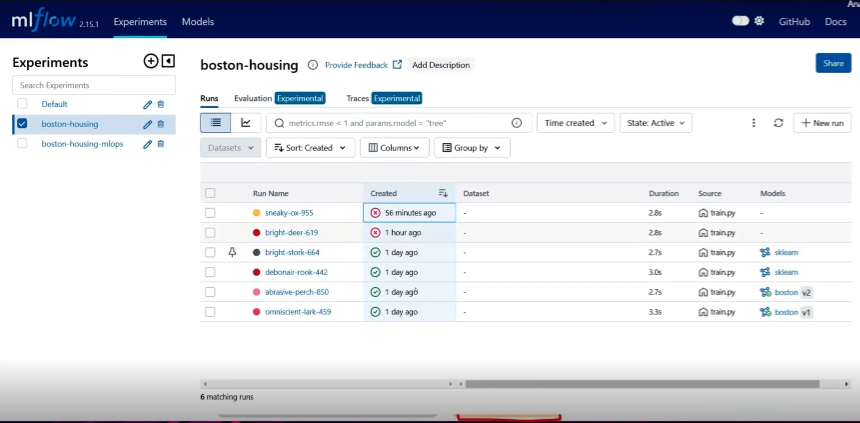
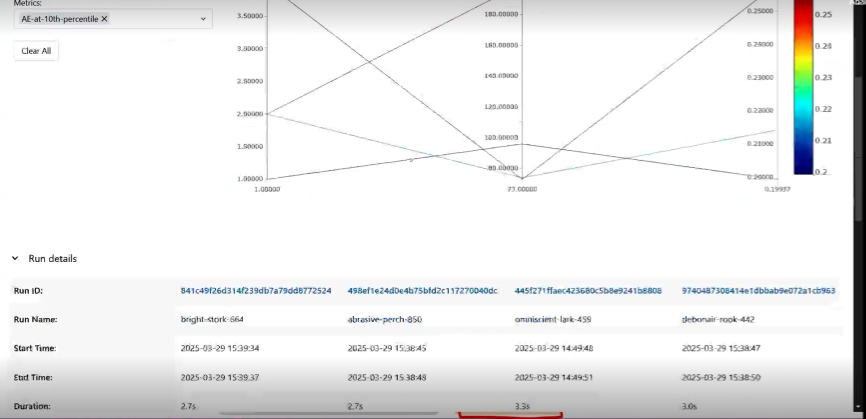
Diagram Description: A high-quality screenshot of the MLFlow UI's "Chart View" or "Compare Runs" page. The screenshot should prominently display multiple experiment runs (e.g., different lines or points) plotted against key performance metrics (e.g., "accuracy," "loss," "F1 score") over training steps or epochs. Below the chart, include the table view showing the logged parameters and metrics for each run, demonstrating the ability to sort, filter, and select runs for comparison. Annotate the image to point out features like the search bar, chart customization options, and the run details sidebar, emphasizing how users can visually analyze and compare their experiments to identify optimal models.
Reproducibility is a cornerstone of effective machine learning. It's difficult to reproduce code if you haven't captured the entire environment, including library dependencies. This is especially true when you want another data scientist to use your code or run it at scale in the cloud. MLFlow Projects address this by providing a standard, reproducible format for packaging your data science code.
MLproject FileAn MLFlow Project is essentially a directory containing your code and an optional, but highly recommended, MLproject YAML file. This file acts as a blueprint, specifying the project's name, defining its entry points (the commands that can be executed), and outlining the required software environment. This standardization enables seamless collaboration within teams and automated execution across different environments and platforms, from your local machine to cloud clusters.
The MLproject file allows you to define one or more entry points, which are specific commands or scripts that can be invoked within your project. These entry points can accept
parameters with defined types (like string, float, int, path, or uri) and default values, making your code highly flexible and configurable without needing to modify the source code directly. You can easily run MLFlow Projects from local directories or Git repositories, specifying which entry point to use and passing parameters directly from the command line or programmatically.
# To run a local project with specific parameters:mlflow run . -P data_file=data.csv -P regularization=0.1# To run a project from a GitHub repository, executing a specific entry point:mlflow run https://github.com/mlflow/mlflow-example.git -e train_model -P alpha=0.5
True reproducibility extends beyond just code and parameters; it critically includes the execution environment itself. MLFlow Projects provide robust mechanisms to manage your project's software dependencies:
python_env.yaml file.conda.yaml file.Dockerfile or a pre-built Docker image. This encapsulates your entire environment, guaranteeing consistent execution.Let's set up a simple MLFlow Project. Create a directory (e.g., my_ml_project) with the following files:
MLproject file:name: MySimpleMLProject python_env: python_env.yaml # Specify the environment file entry_points: main: parameters: n_estimators: {type: int, default: 100} max_depth: {type: int, default: 10} command: "python train.py --n_estimators {n_estimators} --max_depth {max_depth}"
python_env.yaml:
python: "3.9.16" # Pin your Python version
dependencies:
  - mlflow>=2.0.0
  - scikit-learn==1.2.0
  - pandas>=1.5.0
  - numpy>=1.21.0
train.py:
import mlflow
import mlflow.sklearn
from sklearn.ensemble import RandomForestClassifier
from sklearn.model_selection import train_test_split
from sklearn.metrics import accuracy_score
from sklearn.datasets import load_iris
import argparse
import pandas as pd
import warnings

warnings.filterwarnings("ignore")

if __name__ == "__main__":
    parser = argparse.ArgumentParser()
    parser.add_argument("--n_estimators", type=int, default=100,
                        help="Number of trees in the forest")
    parser.add_argument("--max_depth", type=int, default=10,
                        help="Maximum depth of the tree")
    args = parser.parse_args()

    mlflow.set_experiment("MLProject_Example")
    with mlflow.start_run(run_name=f"RF_n{args.n_estimators}_d{args.max_depth}"):
        iris = load_iris()
        X = pd.DataFrame(iris.data, columns=iris.feature_names)
        y = iris.target
        X_train, X_test, y_train, y_test = train_test_split(X, y, test_size=0.2, random_state=42)

        model = RandomForestClassifier(n_estimators=args.n_estimators, max_depth=args.max_depth, random_state=42)
        model.fit(X_train, y_train)

        y_pred = model.predict(X_test)
        accuracy = accuracy_score(y_test, y_pred)

        mlflow.log_param("n_estimators", args.n_estimators)
        mlflow.log_param("max_depth", args.max_depth)
        mlflow.log_metric("accuracy", accuracy)
        mlflow.sklearn.log_model(model, "model")

        print(f"Project run completed with n_estimators={args.n_estimators}, max_depth={args.max_depth}, Accuracy: {accuracy:.4f}")
To run this project, navigate to the my_ml_project directory in your terminal and execute:
mlflow run . -P n_estimators=150 -P max_depth=8
This command will automatically set up the python_env.yaml environment (if not already present), execute train.py with the specified parameters, and log the results to MLFlow Tracking.
Once you've trained a great model, you need a standard way to package it so it can be used in various downstream applications, whether that's real-time serving via a REST API or batch inference on Apache Spark.MLFlow Models provide this convention, ensuring your models are portable and deployable across diverse platforms.
Every MLFlow Model is saved as a directory containing arbitrary files and a crucial MLmodel descriptor file. This
MLmodel file lists several "flavors" the model can be used in. Flavors are a core concept that allows deployment tools to understand how to use a model without needing to integrate with every specific ML library.
For example, a TensorFlow model can be loaded as a TensorFlow DAG, or as a generic Python function.MLFlow defines several "standard" flavors, such as the
python_function flavor, which describes how to run the model as a Python function, enabling broad interoperability.
Libraries like mlflow.sklearn, mlflow.pytorch, and mlflow.tensorflow automatically save models with both their native flavor and the python_function flavor.
The MLmodel file also includes important metadata like time_created, run_id (linking back to the MLFlow Tracking run that created it), and the signature.
Understanding a model's expected inputs and outputs is crucial for correct usage and deployment. MLFlow Models can include additional metadata:
Here's an example of how a model is logged, including its signature:
import mlflow
import mlflow.sklearn
from sklearn.ensemble import RandomForestRegressor
from sklearn.datasets import make_regression
from sklearn.model_selection import train_test_split
from sklearn.metrics import mean_squared_error
import pandas as pd
from mlflow.models import infer_signature # For explicit signature inference

# Set up MLflow tracking (optional, but good practice for remote server)
# mlflow.set_tracking_uri("http://localhost:5000")

with mlflow.start_run(run_name="RandomForest_Signature_Example"):
    X, y = make_regression(n_features=4, n_informative=2, random_state=0, shuffle=False)
    X_train, X_test, y_train, y_test = train_test_split(X, y, test_size=0.2, random_state=42)

    params = {"max_depth": 2, "random_state": 42}
    model = RandomForestRegressor(**params)
    model.fit(X_train, y_train)

    y_pred = model.predict(X_test)
    mse = mean_squared_error(y_test, y_pred)

    mlflow.log_params(params)
    mlflow.log_metrics({"mse": mse})

    # Infer signature from training data and model predictions
    # We convert X_train to DataFrame for column-based signature
    input_example_df = pd.DataFrame(X_train, columns=[f'feature_{i}' for i in range(X_train.shape)])
    signature = infer_signature(input_example_df, model.predict(X_train))

    # Log the model with its signature and an input example
    mlflow.sklearn.log_model(
        sk_model=model,
        artifact_path="random_forest_model",
        signature=signature, # Log the inferred signature
        input_example=input_example_df.iloc[], # Log a single row as an input example
        registered_model_name="RandomForestRegressionModel" # Optionally register it immediately
    )

    print(f"Model logged with MSE: {mse:.4f}")
print("Check MLFlow UI for model details and signature!")Running this code will log the model, its parameters, metrics, and crucially, its inferred signature and an input example. This detailed logging ensures that anyone who needs to use or deploy this model understands exactly what kind of data it expects and what it will output.
As your team develops more and more models, managing their versions, stages, and deployment status can become a significant challenge. The MLFlow Model Registry provides a centralized model store, along with APIs and a UI, to collaboratively manage the full lifecycle of your MLFlow Models.
The Model Registry introduces several important concepts:
None, Staging, Production, Archived). This helps track a model's lifecycle from development through deployment.@champion, @challenger). Aliases provide a mutable, named reference to a specific model version, which is incredibly useful for deployment. You can update production traffic simply by reassigning an alias to a new model version without changing your production code.team:ai-support, use_case:customer_service). Markdown-formatted annotations and descriptions can also be added to provide rich context, such as algorithm details or datasets used.Models must first be logged using MLFlow Tracking before they can be registered in the Model Registry. You can do this programmatically or directly through the MLFlow UI.
You can register a model while logging it during a run:
mlflow.sklearn.log_model(
    sk_model=model,
    artifact_path="my_model",
    registered_model_name="MyAwesomeModel" # This registers the model
)
Or, register a previously logged model:
import mlflow
from mlflow import MlflowClient

# Assuming you have a run_id and artifact_path from a previous MLFlow run
run_id = "your_mlflow_run_id"
artifact_path = "my_model"
model_uri = f"runs:/{run_id}/{artifact_path}"

client = MlflowClient()
client.create_registered_model("MyAwesomeModel") # Create the model name if it doesn't exist client.create_model_version(
    name="MyAwesomeModel",
    source=model_uri,
    run_id=run_id,
    description="A new version of MyAwesomeModel"
)
Once registered, you can load a specific version or a model by its alias:
# Load a specific version
model = mlflow.pyfunc.load_model("models:/MyAwesomeModel/1") # Load version 1

# Load by alias (e.g., the 'champion' model)
champion_model = mlflow.pyfunc.load_model("models:/MyAwesomeModel@champion")
You can also register models directly from the MLFlow UI. Navigate to the details page of an MLFlow Run, click on the model artifact, and then use the "Register Model" button. From there, you can either create a new registered model or add your logged model as a new version to an existing one.
The Model Registry significantly streamlines the deployment process and enhances governance. It allows you to organize and monitor machine learning model versions during testing, quality assurance, and production stages. This centralized system helps teams collaborate on model creation and implementation, and crucially, track which models are being used in various environments. This structured approach to model management is essential for scaling reliable and maintainable machine learning systems, whether you're an individual data scientist or part of a large ML platform team.
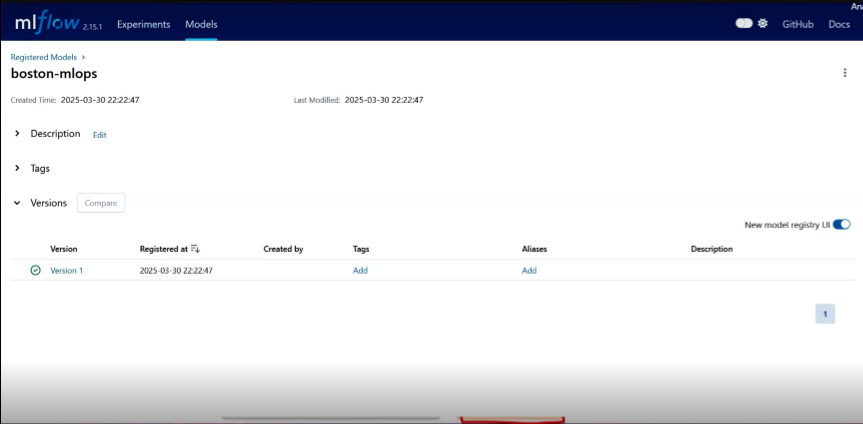
Diagram Description: A high-quality screenshot of the MLFlow UI's "Registered Models" page. The screenshot should display a list of registered models, with one model expanded to show its different versions. For each version, include details like the version number, associated run ID, creation date, current stage (e.g., "Staging," "Production") or aliases, and any tags or descriptions. Highlight the options to transition stages, add aliases, or view lineage, demonstrating how the UI centralizes model governance and lifecycle management.
Machine Learning Operations (MLOps) is the application of DevOps principles to the machine learning lifecycle. It's all about streamlining and automating the deployment, monitoring, and maintenance of ML models in production. MLOps ensures that models remain accurate, reliable, and continuously perform well over time.
MLFlow plays a pivotal role in implementing robust MLOps practices. It acts as a bridge between ML development and deployment, helping to ensure that every step of the ML lifecycle is well-managed and reproducible.
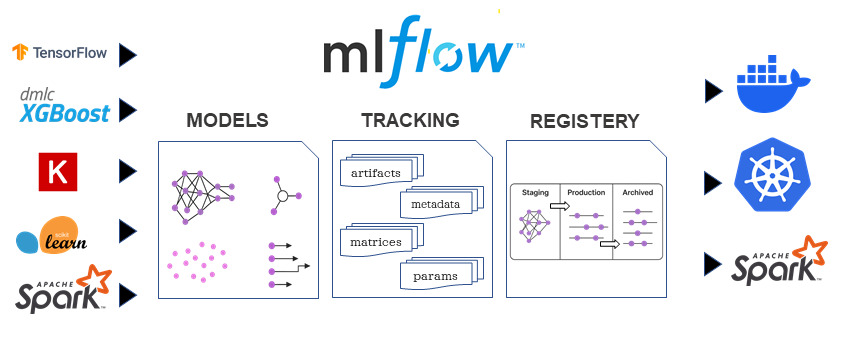
Diagram Description: A block diagram illustrating a typical MLOps workflow, highlighting where MLFlow's components fit in. Start with "Data Collection & Preparation," leading to "Model Development & Experimentation" (where MLFlow Tracking and Projects are prominent). This feeds into "Model Packaging & Versioning" (MLFlow Models and Model Registry). From there, show "Model Deployment" (MLFlow Models, deployment tools) and "Model Monitoring & Feedback" (where MLFlow's logged data supports external monitoring). Arrows should indicate the iterative nature, especially the feedback loop back to data preparation or model development. Emphasize how MLFlow connects these stages for a seamless flow.
Benefits of MLFlow for MLOps
By integrating MLFlow into your MLOps strategy, you gain significant advantages:
The MLOps landscape is rich with tools, and MLFlow often stands out for its simplicity and flexibility. While some platforms (like Valohai, ZenML, or ClearML) offer comprehensive end-to-end MLOps solutions covering tracking, orchestration, and deployment, MLFlow focuses primarily on experiment tracking and model management.
For instance, Kubeflow is designed for automating complex ML workflows and orchestrating pipelines, making it suitable for scenarios requiring extensive pipeline automation. However, it often has a steeper learning curve and can be more complex to set up compared to MLFlo. MLFlow, on the other hand, excels in experiment tracking and model registry, but typically requires integration with external tools like Airflow or Kubeflow for full pipeline orchestration.
The choice depends on your specific needs. MLFlow's lightweight nature and ease of integration across various ML libraries and platforms make it an excellent choice for many ML use cases, especially when you prioritize robust experiment tracking and model lifecycle management.
Ready to start using MLFlow? The basic setup is quite straightforward.
As we saw earlier, you can install MLFlow using pip:
pip install mlflowFor specific ML library integrations (like scikit-learn, XGBoost, PyTorch), you might need to install their corresponding packages.
By default, MLFlow stores all your experiment data (metadata, parameters, metrics, and artifacts) locally in an mlruns directory. This is great for local development. However, for team collaboration or persistent storage, you'll want to set up an MLFlow Tracking Server.
The MLFlow Tracking Server is an HTTP server that allows you to log runs, store metadata in a backend database (like PostgreSQL or MySQL), and save artifacts to a separate artifact store (like AWS S3 or Google Cloud Storage).
To run a basic local tracking server:
mlflow server --host --port 5000
This will make the MLFlow UI accessible at http://localhost:5000.
For a more robust setup with a backend database, you'd configure it like this (example with PostgreSQL):
mlflow server \
    --backend-store-uri postgresql://mlflowuser:password@localhost/mlflowdb \
    --default-artifact-root s3://your-mlflow-artifact-bucket/
    --host 0.0.0.0 \
    --port 5000
This command tells MLFlow to store metadata in your PostgreSQL database and artifacts in an S3 bucket. You'd need to set up the database and bucket separately.
Once your server is running, you need to tell your ML code where to send the tracking data. You do this by setting the tracking URI:
import mlflow
mlflow.set_tracking_uri("http://localhost:5000") # Or your remote server URI
Now, all your mlflow.log_ calls will be sent to this server.
To get the most out of MLFlow and ensure your ML projects are robust and maintainable, consider these best practices:
MLproject file to define entry points and parameters, making your code easy to understand and run by others.conda.yaml or python_env.yaml files, especially for production deployments. For complex dependencies or maximum reproducibility, leverage Docker environments. This ensures that your model behaves identically across different environments.mlflow.log_artifact() to store important files like data visualizations, model checkpoints, and even input datasets. The more context you capture, the easier it will be to debug, reproduce, and understand your experiments later. Consider using mlflow.autolog() for supported libraries to automatically capture many details.@champion for production), and tags to manage your models' lifecycle and facilitate smooth transitions from staging to production. This centralized approach enhances collaboration and governance.MLFlow is a powerful, open-source platform that brings much-needed structure and reproducibility to the often-chaotic world of machine learning development. By providing dedicated components for experiment tracking, code packaging, model management, and a centralized model registry, MLFlow empowers data scientists and MLOps professionals to build, deploy, and manage AI systems with greater confidence and efficiency.
We've seen how MLFlow helps you overcome common challenges like tracking experiments, ensuring code reproducibility, and standardizing model deployment. Its flexible architecture means it can be adapted to various environments, from your local machine to large-scale cloud deployments.
Ready to take your machine learning workflows to the next level?
By embracing MLFlow, you're not just adopting a tool; you're adopting a set of best practices that will make your machine learning journey more organized, collaborative, and ultimately, more successful.

{{AUTHOR}}
A Founder & CEO, Psitron Technologies.
 Launch your Graphy